- global menu
- search this site
- sponsored links


-
- 撮影機材
- store
- category archive
- monthly archive
-
- 2018年2月
- 2017年7月
- 2015年6月
- 2014年8月
- 2014年7月
- 2013年10月
- 2013年6月
- 2013年5月
- 2013年2月
- 2012年11月
- 2012年8月
- 2012年3月
- 2012年1月
- 2011年12月
- 2011年4月
- 2011年3月
- 2010年10月
- 2010年8月
- 2010年5月
- 2010年3月
- 2010年1月
- 2009年11月
- 2009年10月
- 2009年4月
- 2009年3月
- 2009年2月
- 2009年1月
- 2008年12月
- 2008年11月
- 2008年10月
- 2008年9月
- 2008年7月
- 2008年6月
- 2008年5月
- 2008年4月
- 2008年3月
- 2008年2月
- 2008年1月
- 2007年12月
- 2007年11月
- 2007年10月
- 2007年9月
- 2007年8月
- 2007年7月
- 2007年6月
- 2007年5月
- 2007年4月
- 2007年3月
- 2007年2月
- 2007年1月
- 2006年11月
- 2006年10月
- 2006年8月
- 2006年7月
- 2006年6月
- 2005年12月
- powered by


![TAMRON SP AF 17-50mm F/2.8 XR Di II VC LD Aspherical [IF] [Model B005NII]](http://ws.assoc-amazon.jp/widgets/q?_encoding=UTF8&ASIN=B002OED6ZG&Format=_SL110_&ID=AsinImage&MarketPlace=JP&ServiceVersion=20070822&WS=1&tag=edgebook-22)


最新エントリ5件
低価格ヘッドホンアンプDAC-X5Jと低価格デジタルアンプFX202Jで構築するPCオーディオ環境とパッシブスピーカーをテレビとPCで切り替え利用できる環境の構築
2018/02/16 10:59
はじめに
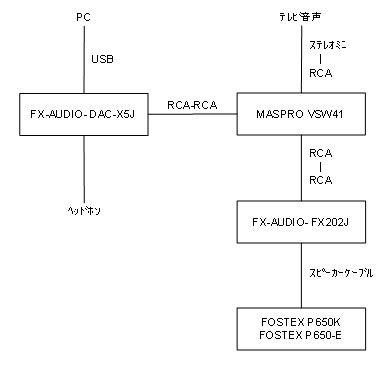
PCではヘッドホンのみ,テレビの時はスピーカーのみという環境から、PC利用時はヘッドホンとデジタルアンプを通したパッシブスピーカーの使い分けができるようになり、テレビの音声も同じデジタルアンプを通したパッシブスピーカーから音が出る環境に変えることができた。テレビ音声をヘッドホンから出力することは考慮していない。
PC利用時にスピーカーが使えないのが不便でヘッドホン,スピーカーの切り替えもしくは同時出力を検討した。当初はステレオミニプラグの分配器とケーブルの差し替えでさらっと終わらせるつもりがこんなことになってしまった。
スピーカーの選定のはずがなぜがアンプへ
スピーカーをもっていないので調べてみるとコストパフォーマンスはアクティブスピーカーよりパッシブスピーカーが高いとのこと。パッシブスピーカーを使うためにはアンプが必要でPCとテレビの入力切替を行うにはプリメインアンプが必要。安くても2万円前後、そしてでかい。こんなものは要らない。
安くてコンパクトなアンプはないのか調べていると中華デジタルアンプと呼ばれるものが流行っている。有名なものはこれ。正確には前の機種であるLP-2020Aが有名らしいが。

アンプの選定のはずがなぜかヘッドホンアンプへ
デジタルアンプのことを調べている途中でヘッドホンアンプとやらを見つけた。当初ステレオミニで分配するつもりだったがせっかくなので買ってみた。
残念な耳のせいで品質の違いがわからなかった。耳もそうだがパソコン側の環境も整っていないのでこれは製品の問題ではない。USBでパソコンと接続してヘッドホンへ音声出力するための機器とか所有欲はとんでもないくらい満たされた。
ACアダプタが別売りなのとパソコンと接続するUSBケーブルを買った。


パソコンとテレビの出力切り替えはどうするか
ヘッドホンアンプのライン出力はRCA端子なのでAVセレクターと呼ばれるものがあればパソコンとテレビの音声を切り替えられる。黒い外観が良かったのでこれにした。

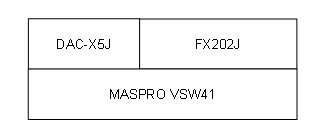
理想の(寸法の)デジタルアンプ
AVセレクターの上にヘッドホンアンプを乗せると半分くらいスペースがある。このスペースにLP-2024A+は乗らない。NFJの製品を眺めているとこんなデジタルアンプが。

中華デジタルアンプを有名にしたLP-2020Aと同じチップを採用していて、なによりVSW41の上の空いたスペースにぴったりと収まる。想定より若干高いが即決。
例によりNFJの製品にはACアダプターがついてこないので以下の商品を購入。

各アンプとAVセレクターは短いRCAケーブルで接続。

スピーカーの選定
低価格で液晶ディスプレイの下におけるサイズであるという条件を満たすパッシブスピーカーは存在しなかった。とあるブログで見かけた「かんすぴ」の組み立て記事からメーカーサイトを調べると小型のスピーカーボックスを別売りしているのに気付いて即決。合わせてユニットも。


これを横置きで液晶ディスプレイの下に設置した。立てて置くのが普通なのだろうが耳が残念なので大丈夫。デジタルアンプとスピーカーは以下のコードで接続した。

こうして当初の予定とは全く異なる環境ができあがった。
ASUS ZenFone 3 ZE520KLの初期設定と購入した追加アクセサリ
2017/07/18 11:53
本体の購入
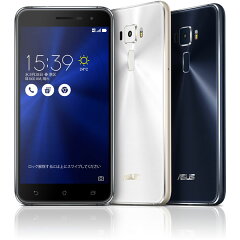
楽天モバイルのスーパーセールから通話SIMセットで購入。
購入した追加アクセサリ
前面背面ともに2.5Dガラスが採用されており保護フィルムの端っこが浮いてくるというレビューが多数。加えて綺麗な本体をカバーなしで使いたいけど保護はしたい。その中から選んだのが以下のもの。

- 前面の保護に。今のところ浮いたりはしていない。

- 背面保護用に上のガラスフィルムと一緒に買ったけどつけた瞬間好みではなかったのでお蔵入り。好みの問題であって商品自体に問題はない。

- 背面保護用に追加で購入。端までは保護されないがひとまずこれで常用。セットの前面フィルムは予備。

- カメラレンズフィルムの定番。今回もこれ。
ASUS ZenFone 2の初期設定と購入した追加アクセサリ
2015/06/01 09:51
本体の購入
JACCSモール経由 0.5% + 楽天ポイント 1% + REXカード 決済1.75%で購入。色は黒、メモリはZenfone2を買うならの4GB、ストレージは必要ないので32GB。

購入した追加アクセサリ
-
- ASUS ZenFone 2 (ZE551ML / ZE550ML) ガラスフィルム 国産ガラス採用 強化ガラス製 液晶保護フィルム 厚さ0.33mm 2.5D 硬度9H ラウンドエッジ加工 エイスース on-device 【国内正規流通品】Zenfone2
- 初めてのガラスフィルム。手触りも良く普通のフィルムよりも好印象。
- ASUS ZenFone 2 (ZE551ML / ZE550ML) ガラスフィルム 国産ガラス採用 強化ガラス製 液晶保護フィルム 厚さ0.33mm 2.5D 硬度9H ラウンドエッジ加工 エイスース on-device 【国内正規流通品】Zenfone2
-
- レイ・アウト ASUS ZenFone2(ZE551ML) マットハードケース ブラック RT-AZ2C4/B
- 裸で使うつもりだったが本体の背面カバーの耐久性が低く傷がつきやすいというレビューが多かったので急きょハードカバーを購入。散々悩んだが惰性でいつも通りのレイ・アウト。惰性で買うには高い気もするが今までも今回も品質に不満がなかったので良しとする。買ったのは黒だが、カバーの色は他にシャンパンゴールドとレッドがある。
- レイ・アウト ASUS ZenFone2(ZE551ML) マットハードケース ブラック RT-AZ2C4/B
-
- ラスタバナナ ASUS ZenFone2 高光沢フィルム P644ZEN2
- ガラスフィルムについていなかったカメラレンズ用のフィルムの為だけに購入。カメラレンズ用のフィルムは2枚入り。
- ラスタバナナ ASUS ZenFone2 高光沢フィルム P644ZEN2
レビュー(買って使ってみて気付いた点)
- 晴天時の屋外での使用で画面が暗いと感じる。比較は省電目的で画面の輝度をギリギリに抑えたXperia GX SO-04D。個人的に不満はない。
- 通知LEDの色が緑?のみ。アプリで設定をしても変わらない。個人的に全く問題がない。
- サイズが大きく厚みがあり上部にある電源ボタンの位置も形状も悪く非常に押しづらい。画面のダブルタップとi-Key
(シングルクリックをPowerボタンに設定)を併用してなんとか片手で操作している。
削除したアプリ(随時加筆)
- Amazon Kindle
- ATOK
- BookLive! Reader for
- i-フィルター
- Omletチャット
- Zinio
初期設定
省電力設定
- 設定 → Wi-Fi → 右上のメニューから詳細設定
- スキャンを常に実行するのチェックを外す
- 設定 → 言語と入力 → 音声検索 → Googleの拡張サービス → 音声出力
- ハンズフリー時のみに変更
- 設定 → 電力管理 → 省電力設定
- カスタマイズモードに変更(プッシュ通知を使用するIMとアプリにはチェックを入れない)
- ※最適モードだと省エネ性能は高いがスリープ時に通知が来ない。
- 設定 → 電力管理 → 自動起動マネージャー
-
プリロード済みの以下のアプリを無効
- 電子書籍
- Data transfer
- UP
- WebStorage
- ダウンロード済みのアプリも可能な限り無効
- 設定 → ASUSカスタマイズ設定
- View Flip Coverを有効にするのチェックを外す
加筆中
ファイルサーバーをWindows Server 2012 や 2008R2 にしたらファイルコピーがとてつもなく遅くなるのを改善する方法
2014/08/26 14:25
SNP(Scalable Networking Pack)を無効にする
-
TCP Chimney Offload の無効化
netsh int tcp set global chimney=disabled
-
Receive-Side Scaling(RSS)の無効化
netsh int tcp set global rss=disabled
-
Network Direct Memory Access(NetDMA)の無効化
netsh int tcp set global netdma=disabled
サーバー側でSMB署名を無効にする
- ファイル名を指定して実行でgpedit.mscと入力してOK
- ローカルコンピュータポリシー → Windowsの設定 → セキュリティの設定 → ローカルポリシー → セキュリティオプション
-
以下の全ての無効を確認(デフォルトで有効なのは一番上だけ?)。
- Microsoftネットワーククライアント:サーバーが同意すれば、通信にデジタル署名を行う
- Microsoft ネットワーク サーバー: クライアントが同意すれば、通信にデジタル署名を行う
- Microsoft ネットワーク サーバー: 常に通信にデジタル署名を行う
CSS記述順序
2014/07/31 13:45
- display
- visibility
- overflow
- list-style
- position
- float
- clear
- top right bottom left
- width
- height
- margin
- padding
- border
-
- background
-
- color
- image
- repeat
- position
- attachement
- color
-
- font
-
- style
- variant
- weight
- size
- line-height
- family
- text-decoration
- text-align
- vertical-align
- white-space
- other text
- quotes
- content